
Hi everyone. I had a long time between updates here, and I've been informed that my post needs updated. So I decided to do it on the blog instead of the forum because I cannot continue to edit the first post. I've also changed a lot of things and learned a lot of things since I put my first seat in.
You can download my older install instructions PowerPoint file from here (not as updated as the stuff you'll find here, but a lot of pictures from here in one spot): download link
Please comment or ask questions! I do believe I was first person to fully document all of this progress.
This post will be as exhausted as I am inquisitive
and OCD. I over-research, over-analyze, and over-worry everything.
PLEASE NOTE!!! I only replaced my driver's seat...I haven't had the desire to do the passenger seat. This is for track and autocross use, so I don't really care about my passenger side. The passenger side presents different challenges because it has a pressure sensor built in for the air bag which is more difficult to defeat. Update: To replace your passenger seat and defeat the air bag, for now you will need the same resistor you have in the driver side PLUS you will need to have an occupancy sensor plugged in. You can get that by partially taking apart your factory seat. It's not sold as a separate part.
WARNING: Disconnect the negative battery terminal and drain remaining power from the system by depressing the brake pedal a few times before you start messing with wiring, just to be safe.
TIP: Click on a photo to increase the size
TL;DR - the Recaro RS-GE, Planted Base, Planted 90 degree side mounts, and OMP slider fits in the car with some modifications, but the Bride Vios III with type LF rails fits INFINITELY better. It also allows you to sit lower, requires no modification of the base, allows you to reinstall the plastic that covers the seatbelt pretensioner, and is generally better. If you want to retain your Bluetooth calling feature, you will also need to re-locate your headrest speakers (you cannot change this - the ND only pumps Bluetooth calls through the driver's headrest speaker). EDIT: I now have OMP HTE-R 400 halo seat on PCI rails. They are probably my middle favorite system.
This post should cover everything you need to do from start to finish with links, torque specs, wiring diagrams, etc. Please let me know if there is anything you need that's missing.
-------------------------------------------------------------------------------------------------------------------------
Table of Contents:
Part #1: Picking a seat
Part #2: List of issues with swapping a seat
Part #3: Seat removal
Part #4: Dealing with airbag lights and other safety
features
Part #5: Headrest speaker replacement/Bluetooth connection
Part #6: Seat installation
Part #7: Driver fitament/broomstick test
-------------------------------------------------------------------------------------------------------------------------
Thanks to the following people for all the help they
provided along the way:
Moti @ Blackbird Fabworx https://www.facebook.com/BlackbirdFabworxFTW
Jeff @ 425motorsports http://www.425motorsports.com/
Josh @ evasivemotorsports http://www.evasivemotorsports.com/mm5/merchant.mvc?
Ron Bauer @ Bauerspeed Racing https://www.facebook.com/bauerspeedracing/
-------------------------------------------------------------------------------------------------------------------------
Part #1 - Picking a Seat:
-------------------------------------------------------------------------------------------------------------------------
Part #1 - Picking a Seat:
In August 2016 I bit the bullet and decided to order a seat.
Now, I had been debating seats for several months. I stumbled by accident
(because it wasn't in the ND section) across this thread where Emilio from 949 and some others were fitting him for a seat
at Sparco USA. Emilio is a pretty tall guy (I think 72-73") compared to me
and Moti (we are both around 68"). He went with the GT3 larger roll bar with no soft top, whereas I opted
for the NDRZ that allowed use of the factory top. His seat needs to be closer
to the floor and much further back than mine.
I am 68 to 68.5" as I stated above, athletic build,
waist size around 32-33 depending on the fit of the pants, 178lbs. I have a
43-44" chest. When I did the race seat box measurement, I came up with around 340mm at a minimum. This is important
to note because I tend to fit in seats better than the measurements would
indicate, FWIW.
Long story eliminated from my original post, but I decided to get the RS-GE seat from Recaro in Velour, but eventually replaced it with the Bride VIOS III (both seats can be purchased in FIA-compliant but less comfortable fabric, or non-FIA compliant but comfortable fabric from Evasive Motorsports). Here are the basic dimensions of the seat to give you a baseline idea (note, I did not buy the alcantara version, but the dimensions are the same):

There are a couple of points to pay attention to when shopping for a seat:
1. The width of the wings is important (here it's 540mm), but it's equally important what height the wings sit at. If they sit higher, the wings have a little leeway of coming up and over the trim of the door. So if you have something that is borderline fitting (you could probably go up to 570 on some models, but that's going to be pretty close to the max), the height of the wings will matter. Also, every company seems to show different dimensions. If you notice the RS-GE doesn't state the height of the wings nor the interior hip dimensions of the seat.
2. The base and hardware you will use will determine how much of a pain in the ass the seat is. The Recaro used a Planted Technology base. The base sucked. It was heavy, the back of the base covered up the back bolts in the floor, and it had to be drilled out to fit the seatbelt pretensioner. It's design also prevented you from lowering the seat all the way. Once I got more into tracking the car, that led me to switch to the Bride with integrated brackets. It was lighter overall and allowed me to practically sit on the floor.
-------------------------------------------------------------------------------------------------------------------------
Part #2 - List of Issues with Swapping a Seat:
1. Will it fit? This is obviously the biggest issue.
2. How do you eliminate the airbag light when you remove the seat with integrated side airbags? Note here that if your airbag light is flashing, it disables the entire airbag system so NONE of them will work. I'll show you how to fix this, although I don't know how to defeat the sensor in the PASSENGER side (it's a different system).
3. Do YOU fit into the seat and pass the broomstick test? This is really tough if you are tall, overweight, or a generally big person. I am pretty fit and of very average height. Most of the seats that fit perfectly in the Miata are smaller, Asian market seats, which tend to be much smaller. Taller people will have a hard time passing the broomstick test, and bigger people will have a hard time fitting into a seat that also fits into the car. This also matters for the holes in the seat with the roll bar and harnesses. You need to have a 0 to 20 degree angle from your shoulders to the bar. So if you sit far below or way above the holes in the seat for the harnesses, it can cause a problem.
4. The Bluetooth calls ONLY come in from the driver's headrest speakers, so if you want to use those or accept BT calls, you must relocate the factory headrest speakers. I will show you how to do that.
5. In either situation, the fifth and sixth points of the harness must be mounted to the base/floor pan of the car using a backing plate. Neither base has an acceptable mounting solution.
6. You need to be able to use the OEM 3-point belt because it's unsafe to run a harness on the street.
7. If you go with the Bride seat, the electrical wiring and whatnot sits super close to the harness routing. I will show you how to make connections for it, but given the choice, and in the future, I will make these more permanent connections (including the airbag resistor) because having the seat that low can dislodge the wiring. Not that fun when you're about to do something like take a drive and your airbag light comes on.
-------------------------------------------------------------------------------------------------------------------------
Part #3 - Seat Removal:
The seat fits best with the Bride rails. With the Planted bracket it sits pretty close to the soft top rods. Overall, though, each choice fits. The Bride just fits better, the seat sits lower against the bar, and it allows you to get proper angles for everything.
Here are the instructions I used to put the Planted seat, sliders, and side mounts together:
http://www.plantedtechnology.com/installation-instructions
When I removed the seat, I ditched the OEM Torx bolts for the aftermarket setup and switched to Class 12.9 bolts of the same thread diameter. The Torx bolts are M10x1.25, 25mm length (20mm of thread engagement). I bought the metric 12.9 bolts (equivalent to Grade 8) 25mm length total thread engagement, 15mm head. If you need to replace the bolt in the pretensioner (reusing the hole for a lapbelt harness) because you are trying to put something else there…the bolt is a 7/16" 20 fine bolt 55mm long and 50mm of engagement.
OEM Torx bolt:


Removal instructions:
1. Remember to disconnect the negative battery terminal.
2. Once I got ready to take the seat out, I had a bunch of crappy towels draped over the edge of the car so I wouldn't scratch. I then reached under the front of the seat and disconnected the wiring harness and unplugged it so it wouldn't snag. You'll basically be removing the seat with the seat-side wiring still attached, leaving the engine-side harness on the floor.

3. Remove the bolts. Take the seat out. At this point the seat will be outside the car, and you'll still have the seatbelt attached to the pretensioner.

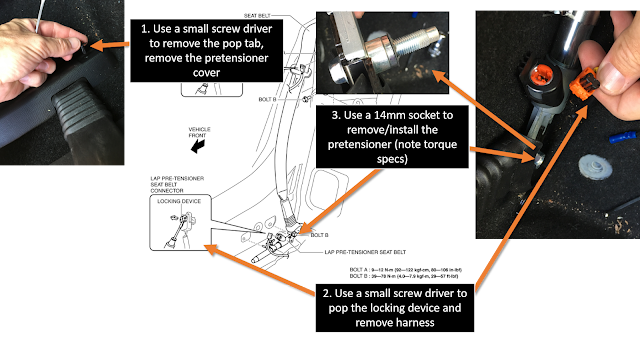
4. Next, once the seat is out, you'll need to remove the seatbelt pretensioner. Follow the steps in the image below.
-------------------------------------------------------------------------------------------------------------------------
Part #3 - Seat Removal:
The seat fits best with the Bride rails. With the Planted bracket it sits pretty close to the soft top rods. Overall, though, each choice fits. The Bride just fits better, the seat sits lower against the bar, and it allows you to get proper angles for everything.
Here are the instructions I used to put the Planted seat, sliders, and side mounts together:
http://www.plantedtechnology.com/installation-instructions
When I removed the seat, I ditched the OEM Torx bolts for the aftermarket setup and switched to Class 12.9 bolts of the same thread diameter. The Torx bolts are M10x1.25, 25mm length (20mm of thread engagement). I bought the metric 12.9 bolts (equivalent to Grade 8) 25mm length total thread engagement, 15mm head. If you need to replace the bolt in the pretensioner (reusing the hole for a lapbelt harness) because you are trying to put something else there…the bolt is a 7/16" 20 fine bolt 55mm long and 50mm of engagement.
OEM Torx bolt:


Removal instructions:
1. Remember to disconnect the negative battery terminal.
2. Once I got ready to take the seat out, I had a bunch of crappy towels draped over the edge of the car so I wouldn't scratch. I then reached under the front of the seat and disconnected the wiring harness and unplugged it so it wouldn't snag. You'll basically be removing the seat with the seat-side wiring still attached, leaving the engine-side harness on the floor.

3. Remove the bolts. Take the seat out. At this point the seat will be outside the car, and you'll still have the seatbelt attached to the pretensioner.

4. Next, once the seat is out, you'll need to remove the seatbelt pretensioner. Follow the steps in the image below.

-------------------------------------------------------------------------------------------------------------------------
Part #4 - Defeating the Airbag Light and Seatbelt Chime:
Disabling the airbag system and everything was much easier than I anticipated.
While there was some discussion that the NC had some magnet
seat position sensor the ND does not appear to have this.
Once you unplug one airbag the entire system shuts down as
indicated by the blinking light.
That's no good, so let's fix that. Blinking light:
Here is a full description of where each wire on the seat side of the harness goes:
Here is a full description of where each wire on the seat side of the harness goes:

Here is the engine side of the harness that you're going to
be using with the associated wiring diagrams:

If you have a seat warmer that's what these wires are for on
the engine side harness:

While the racing seat is still out you'll want to re-attach a seatbelt receptacle so you can use your OEM seatbelt. I removed mine from the seat itself. Here is the diagram from the shop manual with the seatbelt (it shows the passenger seat, but it's set up the same way on the driver side, just opposite):
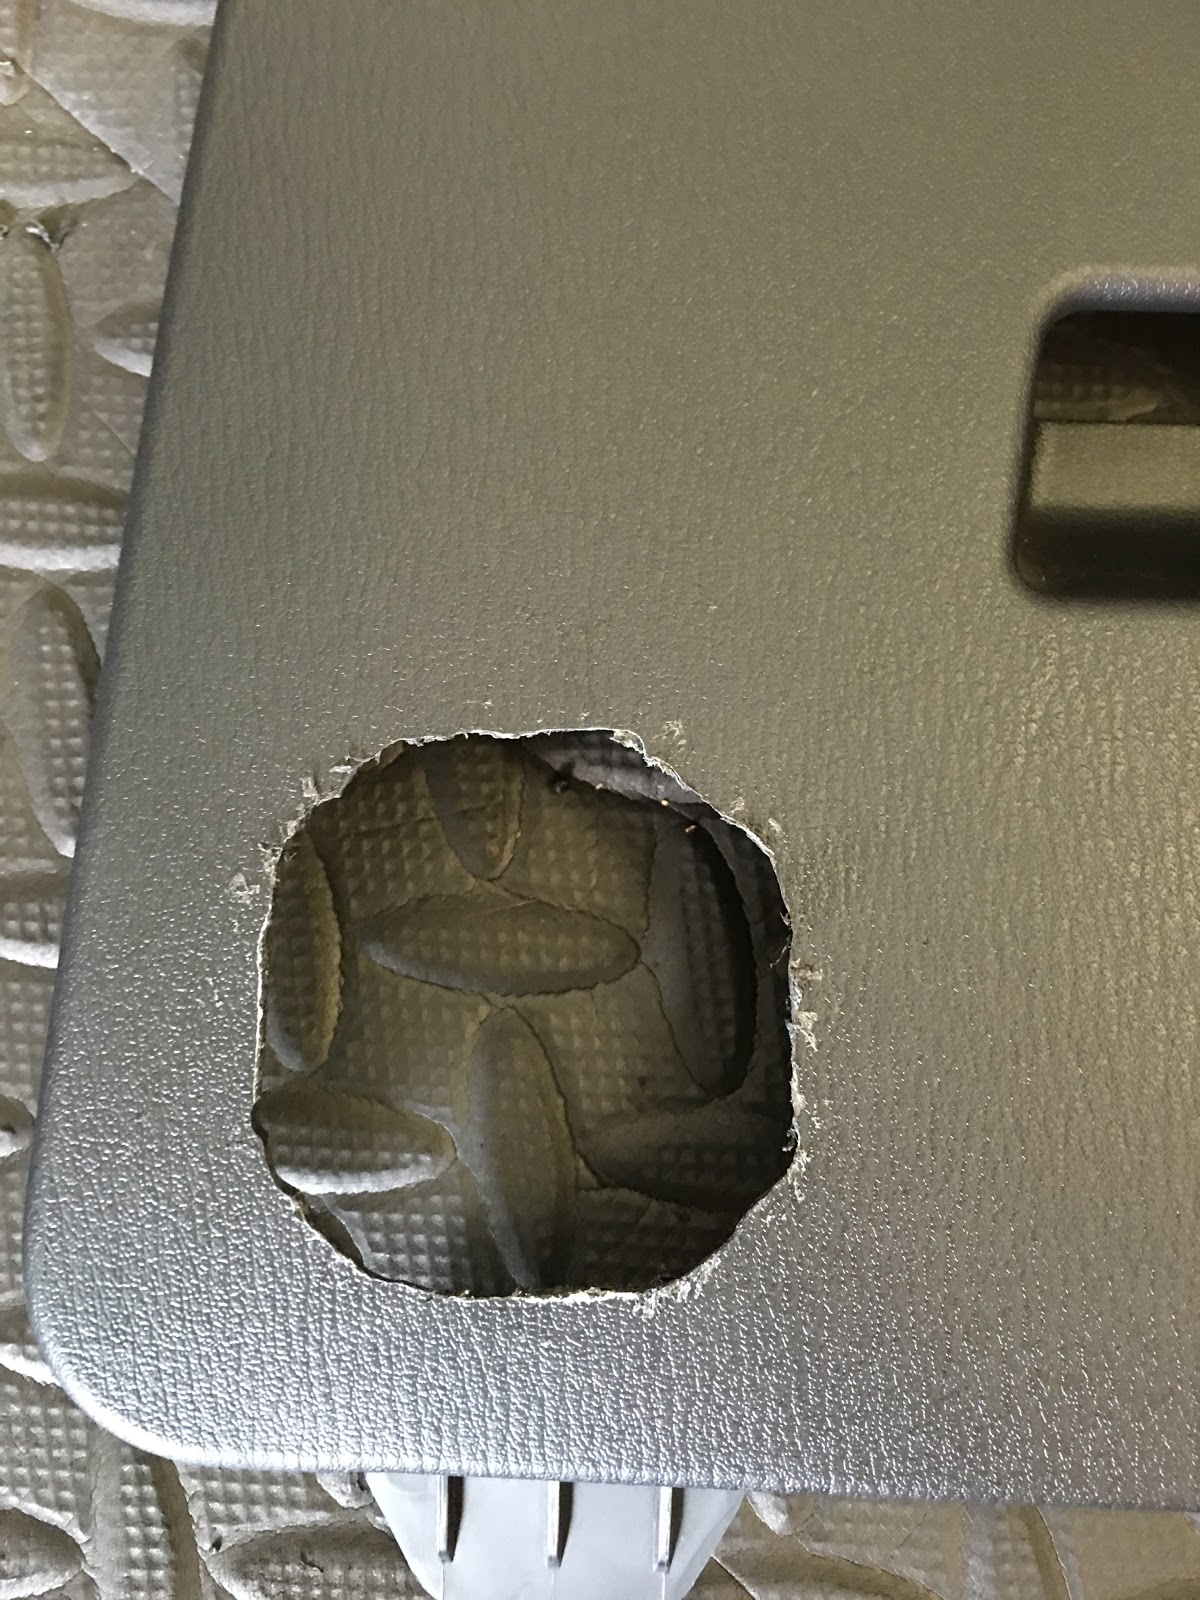
 You will need to cut the seatbelt bracket because it will be too long for the aftermarket seat. And then widen a hole. They're cheap to reorder if you ever need the stock one again.


Here is what it looks like disassembled (left side would be against the seat, work your way right):

Here it is assembled:

Put this back together using new hardware (the other bolt will be likely too long, plus you will need a nut since the OEM seat is a threaded hole). Make sure you use top grade stuff so the bolt is strong in an accident. Do not replace with cheap stuff. You can see what it looks like on the planted bracket, here:

NOTE: With the Planted bracket, you will need a longer seatbelt extension. I used one from Amazon. The product pages keep changing though, so I can't link to them. But basically I used a 7" extension that plugged in, with a fabric strap, and then another buckle at the end. Similar to this. This is needed because the receptacle stays where you see in the picture and does not move when you slide up the seat. With the Bridge, the receptacle moves with the seat, so I only needed an extension like this.
Here are instructions for reusing the stock seatbelt harness piece and installing the resistor to defeat the airbag light:


Here is the hole you will need to widen to get the bolt in:

Here is what it looks like disassembled (left side would be against the seat, work your way right):

Here it is assembled:

Put this back together using new hardware (the other bolt will be likely too long, plus you will need a nut since the OEM seat is a threaded hole). Make sure you use top grade stuff so the bolt is strong in an accident. Do not replace with cheap stuff. You can see what it looks like on the planted bracket, here:

NOTE: With the Planted bracket, you will need a longer seatbelt extension. I used one from Amazon. The product pages keep changing though, so I can't link to them. But basically I used a 7" extension that plugged in, with a fabric strap, and then another buckle at the end. Similar to this. This is needed because the receptacle stays where you see in the picture and does not move when you slide up the seat. With the Bridge, the receptacle moves with the seat, so I only needed an extension like this.
Here are instructions for reusing the stock seatbelt harness piece and installing the resistor to defeat the airbag light:

For the airbag sensor I tested 1/2 watt 1.8, 2, 2.2, 2.4, 2.7, 3, 3.3, and 3.6 ohm resistors, which were difficult to find on the island of Oahu (Radioshack is generally not a reliable place to get these exact resistors from anymore; they have a very small selection). They all worked in shutting off the airbag light. I only tested each one for about 30 seconds so it's possible for them to come back on I guess, but they all worked for the time being.
While there was some discussion that the NC had some magnet seat position sensor the ND does not appear to have this.
Notice in Step 4 above you are reinstalling the harness for the seatbelt buckle that sits near the transmission tunnel. You want this to solve the chiming and whatnot.
Now you're ready to move on to replacing the speakers, if
you care about doing that.
-------------------------------------------------------------------------------------------------------------------------
-------------------------------------------------------------------------------------------------------------------------
Part #5 - Replacing the Speakers:
This is my daily driver so I wanted to try to keep the stock
safety features (airbag etc) as well as attempt to keep my Bluetooth calls etc.
Each headrest has two 4ohm drivers, with the driver's side receiving ALL
Bluetooth calls (hey, I like to call my grandma on my way into work, sue me).
It may not work great for the sound from the stereo but I'm hoping the
Bluetooth (which gets quite loud) will easily come through them even though
they aren't in the headrest. I guess we will see.
I did not want to damage the integrity of my new seat, so I
decided to mount the speakers onto the cubby door. Being that we are going to
be cutting the cubby, you'll be happy to know the part number and price are
available: N243-68-5J0-02 for only $9.00
I bought two of these speakers and the screws made for them
based on a recommendation from a forum member.

These speakers are 57mm square and 50/55mm rectangle where
it actually will be inserted into the panel. The total depth is that will need
to be contained behind the panel is only 28mm. For reference, the handle piece
that extends into the cubby is 25-28mm so I figured that it shouldn't hit
anything (I have the Blackbird Fabworx roll bar coming through this area,
so making a super complicated containment area is neither possible nor
desirable. If it works well enough over time I might refine it by finding a way
to create a mold over the interior pieces that stick out.
The next thing I did was create a cutout to spec of the
speaker to ensure it would fit, to include screw locations. I then cut out the
inner dimensions of 50mm (one side is 55mm but I didn't make my initial cut
that way, I made it about 49x49 to leave some wiggle room). I wanted to make it
as high as possible (to keep it near stock position) but have plenty of room.
Because the cubby slopes up and back and I didn't have my roll bar installed
yet at the time, I decided to instead mount them as best I could based off a pic from an NC
installation. If it doesn't work I figured I could adjust my design after the
roll bar for only $9. So my one speaker is in the upper right and one in the
lower left of the cubby. As it turns out, it fit perfectly fine. You can see the outline of the speaker that I made before cutting here, on the back side, and my plans.
Note that the picture with the red roll bar is on the passenger side of an NC. I used that to get a general idea that the bars slope towards the center of the car, and assumed the driver side would be opposite.


Note that the picture with the red roll bar is on the passenger side of an NC. I used that to get a general idea that the bars slope towards the center of the car, and assumed the driver side would be opposite.


Speaker cut out, front side:

Test fit of the speakers:


Final sound test:
The next task was to run the 16ga wire from the seat side harness that plugs in to the engine side harness under the carpet and up the back into the cubby.


Final sound test:
The next task was to run the 16ga wire from the seat side harness that plugs in to the engine side harness under the carpet and up the back into the cubby.
Next I went to Home Depot and bought some bullet connectors.
The goal here is to be able to swap from stock to aftermarket seat if I want
to, which would be difficult if everything was all soldered and whatnot.
I then labeled everything because I'm anal like that and I
know at some point I'll forget. Now I don't need to mess with looking at the
wiring diagram anymore. It's not super pretty but it's rarely seen.
Wire labeling (I did it for both the aftermarket and stock seat so it was crystal clear which was which):

Wire routing:

IMPORTANT NOTE: The Bride seat sits pretty low to the ground. When you put the harness bolts into the floor, and your store the harness between usage (I stuff mine under the seat), it can hit the wiring. I would still suggest bullet connectors and putting in the resistor the way I did for the airbag, BUT I would wrap each thing with a strip of electrical tape just to secure it a little better. That way if it gets bumped, it won't come loose.
-------------------------------------------------------------------------------------------------------------------------
Part #6 - Reinstalling the Seat:
NOTE: You're going to re-use your stock belt. When you put the seat back in, you're going to run the tensioner so the part that comes from the seatbelt harness goes OVER top of the left side bolster, and the pretensioner assembly goes through the harness hole. Your thighs will likely be flush with the bolsters, so you will have the buckle on the right side OVER the bolster. This didn't present an issue for me, but if your legs are super skinny you might need the right side to go through the hole as well - you do NOT want a gap. YOU CANNOT do this once the seat is already in the car because it will be too tight of a fit to tighten down the pretensioner, so you need to extend the belt out with some towels on the kick panel so you don't scratch it, and kind of put the tensioner back in with the seat either still out of the car or tilted upwards. You can kind of see that awkwardness here:

NOTE: If you use the Planted bracket (not relevant if you use the Bride, because you can reach the rear bolts)...Another thing you will likely need is a 15mm (depending on what bolt head you end up replacing the E12 Torx with) flex ratcheting wrench. The reasoning is that it is a tight fit under the seat base and it isn't completely flat, making a socket nearly impossible and a standard wrench hard to turn.
NOTE: If you use the Planted bracket, here are the specific instructions because the bracket isn't the best (if you use the Bride, just put the bolts in, in the correct order, and go for it):
Install the bolts loosely (just a few threads of engagement) in this order:
1. Right rear behind the seat near the transmission. This is the hardest hole to see, so do this first. You'll likely have to line up the hole from above then get on your knees outside the car and reach without bumping the seat.
2. Left rear behind the seat outboard side. This was awkward for me. I lined up the hole, then dropped the bolt onto the hole. Then I sat on the door sill facing the rear of the car with my left side facing the seat. Without bumping the seat I reached under the seat base with my left palm slightly up and threaded in.
3. Left front. This should line up fairly easy.
4. Right front. Here is the pain in the ass bolt. What I did was remove the cushions from the seat. The bracket leg sits very slightly high on the hole so you won't be able to thread it. I stood on the corner of the seat while my wife threaded in the bolt. That being said I tried it and was able to do it while crouching on the corner and threading…so this isn't necessarily a two person job.
Next go back and tighten the bolts. You will be able to get to the front bolts with a socket but the rears you will need to use the 15mm flex (I found mine at Home Depot). Be VERY patient and focused and slow on these so you don't strip the bolts.
Here is the order to go in with torque specs:

Basically go over it twice in opposite Z movements (LF, RF, LR, RR and then RF, LF, RR, LR).
Note the torque specs. However, you won't be able to get a torque wrench on the rear bolts if you are using the Planted bracket, so I just made them RFT (really f#$^%$# tight).
As you can tell, if you have the Bride bracket, this whole process is much easier.
-------------------------------------------------------------------------------------------------------------------------
Part #6 - Driver Fitament in the Seat/Broomstick Test:
Here is what I looked like for a broomstick test with the Recaro seat. Notice there isn't a ton of room at five foot eight:

I've since switched to the Bride, and before I even put the seat on the lowest setting (note that the setting above on the Recaro was as low as I could get it). This seat is not as low as it can go in the first picture. I will get updated pictures when I get back to Texas showing the new height, as well as heights with the cushions removed, etc. The pictures of me on the track, the seat is in the lowest position, but with the cushions still in. The cushions are probably worth about half an inch more. I'm basically sitting on the floor of the car now. It's hard to judge from the pics on track, but that's all I got for now.


This is what I used my OEM seat for (I created a racing setup for Assetto Corsa):


Wire routing:

IMPORTANT NOTE: The Bride seat sits pretty low to the ground. When you put the harness bolts into the floor, and your store the harness between usage (I stuff mine under the seat), it can hit the wiring. I would still suggest bullet connectors and putting in the resistor the way I did for the airbag, BUT I would wrap each thing with a strip of electrical tape just to secure it a little better. That way if it gets bumped, it won't come loose.
-------------------------------------------------------------------------------------------------------------------------
Part #6 - Reinstalling the Seat:
NOTE: You're going to re-use your stock belt. When you put the seat back in, you're going to run the tensioner so the part that comes from the seatbelt harness goes OVER top of the left side bolster, and the pretensioner assembly goes through the harness hole. Your thighs will likely be flush with the bolsters, so you will have the buckle on the right side OVER the bolster. This didn't present an issue for me, but if your legs are super skinny you might need the right side to go through the hole as well - you do NOT want a gap. YOU CANNOT do this once the seat is already in the car because it will be too tight of a fit to tighten down the pretensioner, so you need to extend the belt out with some towels on the kick panel so you don't scratch it, and kind of put the tensioner back in with the seat either still out of the car or tilted upwards. You can kind of see that awkwardness here:

NOTE: If you use the Planted bracket (not relevant if you use the Bride, because you can reach the rear bolts)...Another thing you will likely need is a 15mm (depending on what bolt head you end up replacing the E12 Torx with) flex ratcheting wrench. The reasoning is that it is a tight fit under the seat base and it isn't completely flat, making a socket nearly impossible and a standard wrench hard to turn.
NOTE: If you use the Planted bracket, here are the specific instructions because the bracket isn't the best (if you use the Bride, just put the bolts in, in the correct order, and go for it):
Install the bolts loosely (just a few threads of engagement) in this order:
1. Right rear behind the seat near the transmission. This is the hardest hole to see, so do this first. You'll likely have to line up the hole from above then get on your knees outside the car and reach without bumping the seat.
2. Left rear behind the seat outboard side. This was awkward for me. I lined up the hole, then dropped the bolt onto the hole. Then I sat on the door sill facing the rear of the car with my left side facing the seat. Without bumping the seat I reached under the seat base with my left palm slightly up and threaded in.
3. Left front. This should line up fairly easy.
4. Right front. Here is the pain in the ass bolt. What I did was remove the cushions from the seat. The bracket leg sits very slightly high on the hole so you won't be able to thread it. I stood on the corner of the seat while my wife threaded in the bolt. That being said I tried it and was able to do it while crouching on the corner and threading…so this isn't necessarily a two person job.
Next go back and tighten the bolts. You will be able to get to the front bolts with a socket but the rears you will need to use the 15mm flex (I found mine at Home Depot). Be VERY patient and focused and slow on these so you don't strip the bolts.
Here is the order to go in with torque specs:
Basically go over it twice in opposite Z movements (LF, RF, LR, RR and then RF, LF, RR, LR).
Note the torque specs. However, you won't be able to get a torque wrench on the rear bolts if you are using the Planted bracket, so I just made them RFT (really f#$^%$# tight).
As you can tell, if you have the Bride bracket, this whole process is much easier.
-------------------------------------------------------------------------------------------------------------------------
Part #6 - Driver Fitament in the Seat/Broomstick Test:
Here is what I looked like for a broomstick test with the Recaro seat. Notice there isn't a ton of room at five foot eight:

I've since switched to the Bride, and before I even put the seat on the lowest setting (note that the setting above on the Recaro was as low as I could get it). This seat is not as low as it can go in the first picture. I will get updated pictures when I get back to Texas showing the new height, as well as heights with the cushions removed, etc. The pictures of me on the track, the seat is in the lowest position, but with the cushions still in. The cushions are probably worth about half an inch more. I'm basically sitting on the floor of the car now. It's hard to judge from the pics on track, but that's all I got for now.


This is what I used my OEM seat for (I created a racing setup for Assetto Corsa):

Thanks for this. Installing my Sparco soon.
ReplyDeleteHi there, I'm wanting to replace my stock black belts for body kit accent coloured ones, (a big faff, for just a cosmetic enhancement) but hey ho.
ReplyDeleteWas wondering if you had a source to the torque top bolts that hold the majority of the belt at the top part as I have to send the complete top spring assembly at the top going down to the pretension bolt..
Thanks for this post, I've used it as my road map to install a Sparco Sprint seat on a PCI base (from Goodwin, awesome product). I was sort of at a loss and getting some bad info on how to keep all the wires happy in my 2016 ND Club. I ended up taking the seat wholly apart, you have to relieve the webbing, easy to do, and re-used all the wiring harnesses from the factory. Did the cubby door speaker deal too, used the factory pieces and the stock seat went back together like a charm. No all i need is to find a resistor, I'm gonna wire it into the air bag's wiring harness which I cut free from the stock seat. In looking at it, a person with time and energy could probably even mount the factory airbag to a race seat. Maybe. But if it had not been for your post here, I'd have been very nervous in doing this and the only real question I would have been absolutely stuck with, since I am not Mr. Electricity, is the pointers on what to use in that wiring loop to keep the airbag system in it's happy place. The only down side here is that I stumbled across this nearly-new Sparco Sprint from a friend, less than half price, I'd been looking at the new QRT-R which I might still get in the off-season which means swapping over to that seat which the nuts and bolts reaching and twisiting and test-fitting in and out and in and out is really a massive pain in the butt. Again, Thanks. This post was a life-saver. PS. Nice car, mine too is in ceramic. Unless you already have it, check out the diffuser also at Goodwin.
ReplyDeleteWould just like to share my experience also! 2016 ND GT. Replaced driver seat with planted bracket and Bride low max. Bolts were a pain in the butt as stated. Used a 2.2 ohm resistor and airbag is solved. I also retained the factory seatbelt buckle and harness. The planted bracket has a bracket included for the seatbelt bucket so no modifications were needed.
ReplyDeleteReplaced passenger side with Bride lowmax and planted bracket. Same thing with seatbelt buckle and harness. Same 2.2ohm resistor for airbag. Also, I pulled the capacitive occupancy sensor out of the bottom of the seat. It's the brown and blue 2 wire harnesses. I installed it in the new bride seat by laying it under the removable cushions in the bride and then activate the sensor by placing double sheets of aluminum foil in the fabric pockets of the cushion, that way the thin fabric acts as the dielectric for the capacitive sensor. Works like a charm!
Second suggestion, instead of putting the resistor at the car harness side, I trimmed back the connector and put the resistor on the seat side of the wire harness, and left enough wire to replace into the factory seat if necessary. Now I KNOW my resistor is set and never moving.
Great write up!
nice tutorial.
ReplyDelete